About Me
- Country Princess
- Hi. My name is Kim and I have four kids. I am married and have been for 16 years. I have been doing tutorials since 2012 and I now also make kits and have been doing so for about 5 years now. Some of the tutorials I make will be with the kits I make. Some will be PTU and some will be FTU.
My Free Copyright

My Avatars

Monday, February 20, 2017
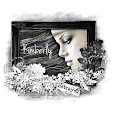
Dreams Of Paris

Dreams Of Paris
I am using the beautiful
PTU kit called Dreams of Paris by Crys and you can find it here:
Template: I am using
template #187 and you can find it here:
I am using this beautiful
FTU tube called Carrie Simply and you can get here:
Let's get started!!!
Open your template and
delete the copyright layer and the Love and Love White layers as well
as the shadow layers. If you like the shadow layers you can keep
them.
Use these papers for these
layers
Square 2-pp#3
double rectangles – pp#4
square 1 – pp#9
strip – pp#10
frame fill – pp#2
frame trim – pp#5
Frame – pp#1
Highlight the top
layer-Open your tube and resize it by 45% and place it like I have
mine-Add a drop shadow to it
Highlight the layer below
the tube layer-Open element #26-Copy and paste it like I have
mine-Add drop shadow to it
Highlight raster layer
9-Open element 6-Copy and paste it-Resize it by 45%-Place it like I
have mine and add a drop shadow to it
Highlight raster layer
9-Open element 17-Copy and paste it then resize it by 50%-Place it
like mine and rotate it just a bit like mine and add a drop shadow to
it
Highlight the top
layer-Open element 19-Copy and paste it-Resize it by 40%-Place it
like mine and add a drop shadow to it
Now just add your
copyright info and you are done!!
Wednesday, July 13, 2016
Little Girl

Little
Girl
Supplies Needed
Scrapkit Used- I am using
a PTU kit called Lost Toys by Crys and you can find it here:
Template that I am using
is by Millie and it is #818 and you can find it here:
I am using a PTU tube by
Laguna called Girl with a Lop Bunny and you can find it here
Let's get started!!!!!
Open the template and
delete the copyright info
Use these papers for these
layers
Layer 1-pp#8
Layer 2-pp#7
Layer 3-pp#2
Layer 4-pp#1
Layer 5-pp#3
Layer 6-pp#14
Highlight layer 6-Select
All-Float-Defloat-Modify-Expand by 3-Click ok-Add a new raster layer
and move it below layer 6-Flood Fill with white-Merge layers 6 and 7
together-Add a drop shadow to it. Resize it by 70% and place it like
I have mine.
Now highlight layer 5 and
open the tube-Copy and paste the Close Up layer of the Little
girl-Resize it by 20%-Place it like I have mine-Highlight layer 5
again and Select All-Float-Defloat-Highlight the tube layer and then
Invert it and then hit delete-double click on the layer in the layer
box. In the blend Mode box select Luminance (Legacy). Merge the tube
layer and layer 5 together. Rotate it like mine.
Highlight layer 5 and then
copy and paste the tube-Go to Image-Mirror it and then resize it by
20% and place it like mine- add a drop shadow to it.
Highlight layer 5 and open
the element called Chest-Copy and paste it-Resize it by 50% and place
it like I have mine-Add a drop shadow to it
Highlight layer 8 and open
the element called Doll and copy and paste it-Mirror it-Resize it by
30% and place it like I have mine-Add a drop shadow to it
Highlight layer 9-Open the
element called Plant-Copy and paste it-Resize it by 50% and place it
like I have mine-Add a drop shadow to it
Now just add your tube
license info and a name.
Good Luck and have fun.
Friday, July 8, 2016
My Little Sun

My
Little Sun
Supplies Needed
Scrapkit- I am using a PTU
kit called Lost Toys by Crys and you can find it here:
Template that I am using
is by Millie and you can find it here:
Tube I am using is called
My Little Sun by Zalta M and you can find it here:
The mask I used is from
Sophisticat Simone and the mask number is 179 and you can find it
here:
Script I used is called
Dancing Script. I have had it for so long but I can't for the life of
me remember where I got it from.
Let's begin!!!!
Open your template and
delete the copyright info.
Use these papers for these
layers:
Layer 1-pp#16
Layer 2-pp#16
Layer 3-pp#13
Layer 4-pp#13
Layer 5-pp#15
Layer 6-pp#15
Layer 7-pp#5
Layer 8-pp#8
Layer 9-pp#18
Now select layer 9 and go
to Selections, then Select All, then Float and then Defloat. Now
highlight layer 8 and hit delete. Then move layer 8 above layer 9.
Now we need to highlight
layer 9-Go to Selections and Select All-Float-Defloat-Open the tube
and copy and paste the close-up of the tube to layer 9 then resize it
by 80%-Invert it-Delete and place it like I have mine. Now add a
drop shadow to it and to layer 8.
Now go to layer 10 which
is the tube layer and double click on the layer in the layer box. In
the blend Mode box select Luminance (Legacy). Click ok and merge
layers 10 and 9 together.
Add drops shadows to all
other layers. You do not have to do this if you do not like how it
looks.
Highlight layer 9 (which
should be your top layer)
Now we need to open the
tube again (if you closed it already) and copy and paste boy 2.
Resize it by 70% and mirror it. Add a drop shadow to it. Place like I
have mine.
Highlight layer 8 and open
the Beanbag element. Place it like I have mine.
Highlight layer 8 and open
the Ball element and resize it by 60% and place it like mine. Now add
a drop shadow to it.
Highlight layer 12 and
open the Pillows element. Place it like I have mine and add a drop
shadow to it.
Highlight layer 11 and
open the Unicorn element and resize it by 50%. Place it like I have
mine and add drop shadow.
Highlight layer 6 and then
open the Leaf 5 element and resize it by 50% and place it like mine.
You will need to duplicate it 4 times and then merge the four
duplicated layers together with the original layer and add a drop
shadow.
Highlight layer 8 and open
the flower 3 element. Copy and paste it like I have mine. You will
have to duplicate it 6 times. Once you have them all placed merge the
6 duplicated layers together with the original Flower 3 layer. Drop
shadow.
Highlight the top layer
and open the Word Art 2 element and resize it by 60% and place it
like I have mine. Drop shadow it.
For the mask I used paper
#2
Now just add your tube
license info and a name.
Good Luck and have fun.

Friday, May 8, 2015
Rainbow Pals

Supplies Needed
Scrapkit Used-I am using
the PTU kit called Rainbow Pals by Freeks Creations. You can find the
kit here:
Template Used-I am ujsing
template #5 by Becky's Creations. You can find it here:
Let's get started!!!
Open your template delete
the copyright info and all shadow layers and the background layer as
well.
Use these papers for these
layers
Yellow Square – pp# 9
Dark Rectangle – pp# 4
Poka Dots – pp# Delete
this layer
left frame fill – pp# 7
left frame trim – pp# 8
left frame – pp# 10
right frame fill – pp# 7
right frame trim – pp# 8
right frame – pp# 10
teal hearts – pp# 5
creamy white hearts –
pp# 1
black hearts – pp# 8
Now highlight raster layer
6-Using your magic wand tool click inside it-Modify-Expand by
6-Highlight raster layer 4-Open the Girl element-C/P-Resize it by
45%-Select-Invert-Delete-Deselect All-Add a drop shadow to this layer
Highlight raster layer 5-
Using your magic wand tool click inside it-Modify-Expand by
6-Highlight raster layer 3-Open the element called Girl2-C/P-Resize
it by 45%-Select-Invert-Delete-Deselect All-Add a drop shadow to this
layer
Highlight the top
layer=Open the element called Heart-C/P-Resize it by 30%-Place it
like I have mine-Add a drop shadow
Highlight the top
layer-Open the element called Wordart-C/P-Resize it by 60%-Place it
like I have mine-Add drop shadow
Now just add a name and if
you used a tube make sure to add your license number!!!!
Thank you for looking!!
Friday, April 3, 2015
Shack Your Shamrocks

Supplies Needed
Scrapkit Used – I am
using a PTU kit called Shack Your Shamrocks by Creative Scraps by
Crys. You can find this kit here:
Template Used – I am
using template #720 by Millie and you can find it here:
Let's get started!!!!
Open your template and
delete the copyright info and raster layer 7
Highlight raster layer
6-Click on it with your magic wand tool-Then highlight raster layer
5-Hit the delete key and then move it above raster layer 6-Highlight
raster layer 6 again- Open element # 2-C/P-Place it like mine-Now
highlight raster layer 5 again and click inside it with your magic
wand tool-Selections- Modify-Expand it by 3- Now highlight the
element layer (should be raster layer 1)-Selections-Invert-Delete-
Add a drop shadow to it
Use these papers for these
layers
Raster layer 1- pp# 1
Raster layer 2 – pp# 5
Raster Layer 3 – pp# 9
Raster Layer 4 – pp# 10
Raster Layer 5 – pp# 7
Raster Layer 6 – pp# 10
Raster Layer 8 – pp# 6
Raster Layer 9 – pp# 6
Highlight raster 8 –
Open element # 32 - C/P – Resize it by 40%-Place it like mine-Add a
drop shadow to it
Highlight the top layer in
the layer box-Open element # 17-C/P-Place it like mine-Add a drop
shadow to it
Highlight raster layer
9-Open element # 19-Resize it by 40%-Place it like mine-Add a drop
shadow to it
Highlight raster layer
8-Open element # 38-C/P-Resize it by 50%-Place it like mine-Add a
drop shadow to it
Now add your name and your
done.
Thanks for reading this
tutorial!!!!
Country Princess!!
Saturday, February 14, 2015
Love Is Sweet!!!

Supplies Needed
Scrapkit Used- I am using
a PTU kit called Love Is Sweet by Freeks Creations and you can find
it here:
Tube Used- I am using a
PTU tube called Christina by Lady Mishka. The tube is no longer
selling this tube but you can always use another one if you do not
already have it.
Template Used- I am using
a template called Your Beautiful by Creative Scraps by Crys and you
can find it here:
Mask of Choice
Font of Choice
Let's get started!!!
Open your template and
delete the credits
Open your tube-C/P-Place
it like I have mine-Add a drop shadow to it.
Highlight raster layer
3-Open your tube-C/P-Place it like mine-Highlight raster layer
5-Using the magic wand tool click inside the center of the
frame-Modify-Expand by 8-Highlight the tube layer again-Invert
it-Delete it
Use these papers for these
layers
Raster Layer 4-pp#
2-Resize it by 110%
Copy of Raster Layer 4-pp#
10-Resize it by 110%
Copy (2) of Raster Layer
4-pp# 2-Resize it by 110%
Raster Layer 9-pp# 5
Raster Layer 2-pp# 10
Raster Layer 7-pp# 4
Raster Layer 8-pp#
1-Resize it by 115%
Raster Layer 3-pp# 9-Now
highlight the second tube layer-Double click on the layer in the
layers box-Change the Blend Mode to Luminance (Legacy)-Click Ok-Add a
drop shadow-Merge it with raster layer 6
Raster Layer 5-Add a new
raster layer-Using this color #3c828a flood fill it with the bucket
tool-Delete the original layer-Adjust-Add Noise-30%-Add a drop shadow
Raster Layer 6-pp# 4
Raster Layer 10- Add a
new raster layer-Using this color #3c828a flood fill it with the
bucket tool-Delete the original layer
Raster Layer 14-Add a new
raster layer-Using this color #9d051e flood fill with the bucket tool
or the paint brush-Delete the original layer
Raster Layer 11- Using
this color #f5a6a1 flood fill with the bucket tool or the paint
brush-Delete the original layer
Raster Layer 13- Add a new
raster layer-Using this color #9d051e flood fill with the bucket tool
or the paint brush-Delete the original layer
Raster Layer 12-Using this
color #f5a6a1 flood fill with the bucket tool or the paint
brush-Delete the original layer
Merge raster layers 11, 8.
and 5 together-Move it so it looks like mine-Add a drop shadow to it
Highlight raster layer
15-Open the element called Cluster-C/P-Resize it by 70%-Place it like
mine-Duplicate it-Mirror it-Merge them together-Add a drop shadow
Highlight the top
layer-Open the element called Bird-C/P-Resize it by 70%-Place it like
mine-Add a drop shadow to it
Now just add your name and
copyright info for the tube and your done
Thank you for reading my
tut!!!!
Monday, February 9, 2015
I Love You!

Supplies Needed
Scrap Kit-I am using a PTU
kit called Lucky In Love from Creative Scraps by Crys and you can
find it here:
Tube Used-I am using a FTU
tube called Amy3 by Sweet Pin-Up and you can find it here:
Template Used-I am using
Template #251 by Becky P's Creations and you can find it here:
Let's get started!!!
Open your template and
delete the credits layer as well as any Shadow layers
Highlight the Frame Fill
layer-Open your tube-C/P-Resize it by 30%-Place it like I have
mine-Highlight the Frame layer-Click inside of it with your magic
wand tool-Modify-Expand it by 8-Click on your tube layer
again-Invert-Delete-Add a drop shadow to it.
Use these papers for these
layers
Frame-pp#14
Frame Trim-pp#8
Frame Fill-pp#13
floral swirl1-pp#11
floral swirl2-pp#11
Rectangle 1-pp#12
Rectangle 2-pp#3
Square 1-pp#12
Square 2#-pp#3
Highlight the top
layer-Open element #37-C/P-Resize it by 60%-Place it like mine-Add a
drop shadow to it
Highlight the top
layer-Open element #41-C/P-Resize it by 45%-Place it like I have
mine-Using the eraser tool erase the edges of the element so that it
looks like mine-Add a drop shadow to it
Highlight raster layer
5-Open element #7-C/P-Resize it by 45%-Place it like mine-Add a drop
shadow to it
Highlight raster layer
10-Open element #52-C/P-Resize it by 55%-Place it like mine-Add a
drop shadow to it
Highlight the top
layer-Open element #25-C/P-Resize it by 30%-Place it like I have
mine-Add a drop shadow
Now just add your name and
copyright info and you are done!!!
Sunday, February 8, 2015
Lucky In Love

Supplies Needed
Scrap kit Used – I am using a PTU kit by Creative Scraps by Crys called Lucky In Love and you can find it here:
Template Used -I am using template 190 by Becky P's Creations and you can find it here:
Tube Used -I am using a PTU tube called Bridal Bouquet by Alex Prihodko and you can find it here: http://picsfordesign.com/en/catalogue/a115856.pix
Let's get started!!!!!
Open the template and delete the credits.
Open your tube-Copy and Paste it-Resize it by 40%-Place it like I have mine-Add a drop shadow
Use these papers with these layers
circle stitch-pp#9
circle frame-pp#10
circle 1-pp#4-Resize it by 50%
circle 2-pp#8
heart shape-pp#7
strip 1-pp#9
circle 3-pp#5
square stitch trim-pp#10
square frame-pp#4
square-pp#1
Highlight raster layer 2-Open your tube again (if you closed it) and copy and paste it-Go to Image then Mirror it-Resize it by 50%-Highlight raster 3-Click on the
magic wand tool-Click inside the circle-Selections-Modify-Expand it by 6-Highlight the second tube layer that you just pasted above raster layer 2-Selections-Invert-
Delete-Add a drop shadow to it-Selection-Select None-Double click on the tube layer-Change the Blend Mode to Luminance (Legacy)-Merge it with raster layer 2
Highlight raster layer 2-Open element #52-Copy and Paste it-Resize it by 60%-Place it like I have mine-Add a drop shadow if you want to.
Highlight raster layer 3-Open element #38-Copy and paste it-Resize it by 50%-Place it like I have mine-Add a drop shadow.
Highlight raster layer 8-Open element #60-Copy and Paste it-Resize it by 40%-Place it like mine-Add a drop shadow
Highlight raster layer 11-Open element #64-Copy and paste it-Resize it by 40%-Place it like mine-Add a drop shadow
Higlight raster layer 12-Open element #25-Copy and Paste it-Resize it by 35%-Place it like mine-Add a drop shadow
Now juat add your name and the copyright info for the tube.
Thank you for reading my tutorial. I hope you enjoyed it!!!
Sunday, January 27, 2013
Hearts N Roses

Supplies Needed
Kit-I am using a PTU kit called V-Day Hearts N Roses by Sassi Designs and you find this wonderfull kit here
Tube-I am using a PTU tube called Ellen and it's from Lady Mishka. The last place I knew she was selling her tubes was here
Mask of Choice
Font of Choice
Let's get started!!!!
Open a new canvas sized 720x720 with a white background
Open frame number 5-C/P-Resize it by 80%-Place it in the center of the canvas like mine-Click inside of the frame with your magic wand tool-Modify-Expand by 10-Highlight the background layer-Open paper #24-C/P-Invert it-Delete-Select None
Highlight the frame layer-Open your tube-C/P-Resize it by 40%-Place it in the center of the frame like mine-Hightlight the frame layer-Duplicate it-Move the duplicated layer above the tube layer-Erase the top part of the frame like mine-Do the same thing but for the bottom of the tube-Drop shadow the tube and the original frame layer
Highlight the background layer-Apply Mask-Merge Group
Highlight the top layer-Open element #125-C/P-Resize it by 35%-Now duplicate it a few times and place them so it looks like I have mine-Merge them all together-Drop shadow them
Highlight the top layer-Open element # 107-C/P-Resize it by 35%-Place it like mine-Drop shadow it
Highlight raster 4-Open element #90-C/P-Resize it by 40%-Place it like mine-Drop shadow it
Highlight raster 6-Open element #138-C/P-Resize it by 30%-Place it like mine-Drop shadow it
Highlight raster 6-Open element #24-C/P-Resize it by 45%-Place it like mine-Drop shadow it
Highlight raster 1-Open element #5-C/P-Place it on the left side of the canvas like mine-Duplicate it-Mirror it-Merge them together-Drop shadow it
Now just add your name and copyright info
Blue Candy Crush

Supplies Needed
Kit- I am using my own PTU kit called Blue Candy Crush and you can get it here
Tube- I am using a PTU tube called Tiffany and you can find her here
Template- I am using a template from Becky's Creations. I am using template #188 and you can find it here
Mask of Choice
Font of Choice
Let's get started!!!
Open your template-Delete the credits and the Love Square layer
Use these papers for these layers
pink vertical rectangle-pp#2
pink horizontal rectangle-pp#8
Heart 3-pp#6
heart 2-pp#7
heart 1-pp#6
raster 1-pp#5
Love-pp#6
4 small hearts-pp#8
frame fill-pp#15
frame-pp#3
Now merge the frame trim and raster 10 layers together-Open your tube-C/P-Resize it by 60%-Place it in the center like mine-Highlight raster 10-Duplicate it-Move the duplicated layer above the tube layer-Erase the top part of the frame so that it looks like mine-Do the same thing for the bottom part of the tube layer-Drop Shaow the tube layer and the original frame layer
Highlight the top layer-Open element #44-C/P-Resize it by 25%-Place it on the right side of the frame like mine-Open element #45-C/P-Resize it the same as the other one-Place it like mine-Duplicate raster 5-Place it like mine-Duplicate raster 6-Place it like mine-Merge them together-Drop shadow them
Highlight the top layer-Open element #6-C/P-Resiize it by 50%-Place it like mine-Drop shadow it
Highlight the top layer-Open element #109-C/P-Resize it by 55%-Place like mine-Drop shadow it
Highlight raster 6-Opene element # 5-C/P-Resize it by 20%-Place like mine-Drop shadow it
Highlight the top layer-Open element #19-C/P-Resize it by 30%-Place like mine-Drop shadow it
Highlight the Copy of raster 10 layer-Open element #105-C/P-Flip it-Resize it by 40%-Rotate it a bit to the right-Place it on the left side of the canvas like mine-Duplicate it-Mirror it-Merge them together-Drop shadow it
Highlight the background layer-Apply Mask-Merge Group
Highlight raster 6-Open element # 82-C/P-Resize it by 35%-Place it like mine-Drop shadow it
Now just add your copyright info and name
Subscribe to:
Posts (Atom)
My Blinkie

I CT for

Blogs I Like


Blinkies


