About Me
- Country Princess
- Hi. My name is Kim and I have four kids. I am married and have been for 16 years. I have been doing tutorials since 2012 and I now also make kits and have been doing so for about 5 years now. Some of the tutorials I make will be with the kits I make. Some will be PTU and some will be FTU.
My Free Copyright

My Avatars

Saturday, February 14, 2015
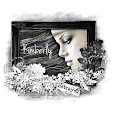
Love Is Sweet!!!

Supplies Needed
Scrapkit Used- I am using
a PTU kit called Love Is Sweet by Freeks Creations and you can find
it here:
Tube Used- I am using a
PTU tube called Christina by Lady Mishka. The tube is no longer
selling this tube but you can always use another one if you do not
already have it.
Template Used- I am using
a template called Your Beautiful by Creative Scraps by Crys and you
can find it here:
Mask of Choice
Font of Choice
Let's get started!!!
Open your template and
delete the credits
Open your tube-C/P-Place
it like I have mine-Add a drop shadow to it.
Highlight raster layer
3-Open your tube-C/P-Place it like mine-Highlight raster layer
5-Using the magic wand tool click inside the center of the
frame-Modify-Expand by 8-Highlight the tube layer again-Invert
it-Delete it
Use these papers for these
layers
Raster Layer 4-pp#
2-Resize it by 110%
Copy of Raster Layer 4-pp#
10-Resize it by 110%
Copy (2) of Raster Layer
4-pp# 2-Resize it by 110%
Raster Layer 9-pp# 5
Raster Layer 2-pp# 10
Raster Layer 7-pp# 4
Raster Layer 8-pp#
1-Resize it by 115%
Raster Layer 3-pp# 9-Now
highlight the second tube layer-Double click on the layer in the
layers box-Change the Blend Mode to Luminance (Legacy)-Click Ok-Add a
drop shadow-Merge it with raster layer 6
Raster Layer 5-Add a new
raster layer-Using this color #3c828a flood fill it with the bucket
tool-Delete the original layer-Adjust-Add Noise-30%-Add a drop shadow
Raster Layer 6-pp# 4
Raster Layer 10- Add a
new raster layer-Using this color #3c828a flood fill it with the
bucket tool-Delete the original layer
Raster Layer 14-Add a new
raster layer-Using this color #9d051e flood fill with the bucket tool
or the paint brush-Delete the original layer
Raster Layer 11- Using
this color #f5a6a1 flood fill with the bucket tool or the paint
brush-Delete the original layer
Raster Layer 13- Add a new
raster layer-Using this color #9d051e flood fill with the bucket tool
or the paint brush-Delete the original layer
Raster Layer 12-Using this
color #f5a6a1 flood fill with the bucket tool or the paint
brush-Delete the original layer
Merge raster layers 11, 8.
and 5 together-Move it so it looks like mine-Add a drop shadow to it
Highlight raster layer
15-Open the element called Cluster-C/P-Resize it by 70%-Place it like
mine-Duplicate it-Mirror it-Merge them together-Add a drop shadow
Highlight the top
layer-Open the element called Bird-C/P-Resize it by 70%-Place it like
mine-Add a drop shadow to it
Now just add your name and
copyright info for the tube and your done
Thank you for reading my
tut!!!!
Subscribe to:
Post Comments (Atom)
My Blinkie

I CT for

Blogs I Like


Blinkies


0 comments:
Post a Comment